Restaurant’s Guide to MENU TIGER Table Management
Last Updated: June 17, 2026
Menu Tiger welcomes 2026 with a top-notch upgrade: the Table Management feature.
With this, restaurants can better manage operations and services by eliminating seating and reservation chaos, walk-in confusion, and the constant guesswork of table turnover.
With every seat, floor, and table reservation tracked with precision, seating is no longer a source of stress. Instead, it becomes a seamless, data-driven task that maximizes every square inch of your space.
Don’t let an inefficient seating area hold your business back. Learn how to set up your system and start managing tables like a pro.
Table Management feature explained: What it is, and how it works
Menu Tiger’s Table Management helps restaurants handle reservations, assign seating for walk-ins, and oversee the entire dining room from a single, intuitive system. No need to pay extra for a third-party restaurant reservation system. Everything you need from booking, seating, and dining service is now handled in Menu Tiger’s all-in-one platform.
This upgrade addresses challenges like double bookings, chaotic layouts, and delayed service, providing better visibility, faster table turnover, and smoother operations.
It offers two main functions—setting up the entire restaurant table layout and managing orders per table—each designed for ease of use and efficiency:
“Configure Tables” tab

The Configure Tables function allows you to set up, manage, and edit the floor layout, add tables, and adjust seating details according to the restaurant's actual setup.
Here you can find buttons and tools such as:
- Floor tabs
Switch between different floors in your restaurant to manage tables individually.
- Plus Button
Adds floors to reflect the structure of the restaurant. This is useful for restaurants with multiple levels or separate dining areas.
- Pencil Icon (Action Section)
Edits individual table details, including chair count, table shape, and table name. Make sure to adjust these details to reflect your restaurant design ideas and layout.
- Pencil Icon (Floor Section)
Renames floors to match how the restaurant identifies each level or area.
- Table Map
Displays the restaurant’s blueprint, providing a clear visual overview of the entire layout. This helps ensure that the digital setup matches the actual dining space.
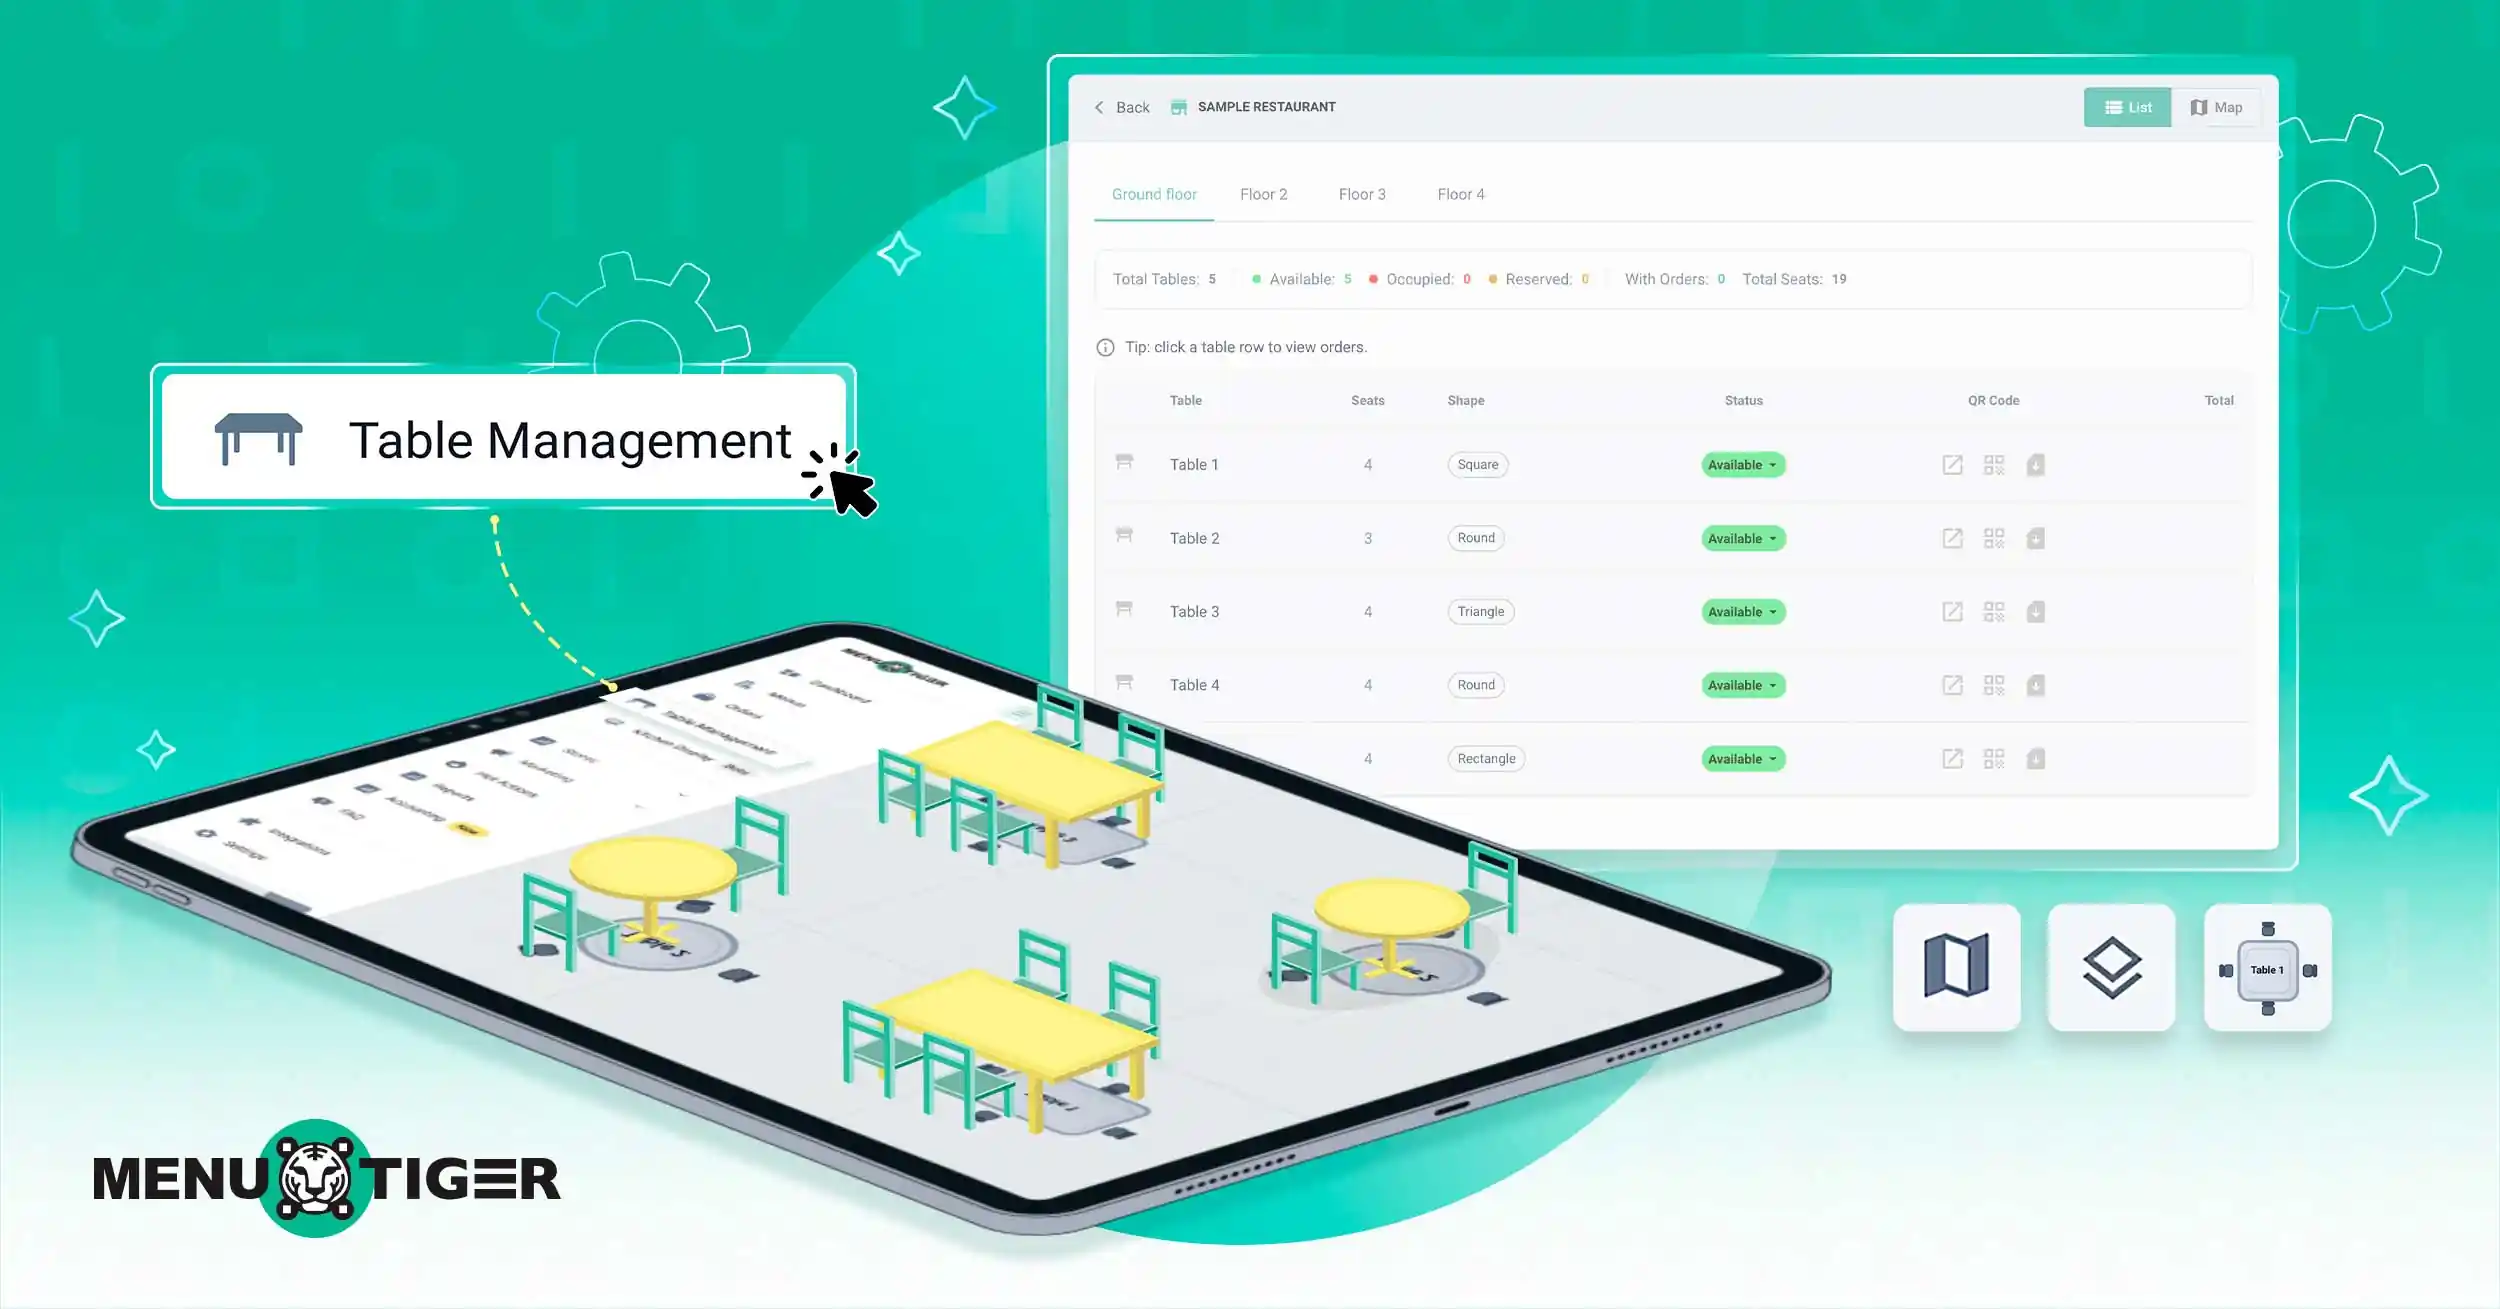
“View Table Orders” tab

The View Table Orders function allows users to manage seating per table and monitor the entire dining room in real time, from the ground floor to the top floor.
You can leverage tools such as:
- Status Section
Shows table real-time availability: Available, Occupied, or Reserved.
- QR Code Section
Includes three action icons:
Web icon – Opens the restaurant website
QR code icon – Generates a unique QR code menu for each table
File icon – Downloads the table’s QR code menu for printing or sharing
- List and Map Buttons
List view shows all tables in a structured list format
Map view displays the digital floor plan for a visual overview of table availability
With these features together, restaurants can now easily manage a chaotic dining area, empower staff to work more efficiently, and provide a seamless dining experience for customers.

How to set up the MENU TIGER’s table management system
Set up your system and manage your tables with these easy steps:
Step 1. Log in to your MENU TIGER dashboard

If you already have a MENU TIGER account, simply go to www.menutiger.com and log in with your credentials to get started.
If you don’t have an account yet, you can sign up quickly using your Google account or register manually with your email and a password of your choice.
Step 2. Go to the Table Management section

From the dashboard, click on “Table Management” to open the main page.
Step 3. Click the + Card and enter your restaurant’s information

Enter your restaurant details, including:
- Restaurant name
- Address
- Store phone number
- Store logo
- Store image
Once completed, click “Save.” You will be redirected back to the main page.
Step 4. Select Configure Tables

On the bottom part of your restaurant card, click “Configure Tables.”
Pro tip: Complete the table setup during onboarding to avoid layout changes during service hours.
Step 5. Add floors to the Table Management feature setup

At the top view of the screen, click the + button to add floors and double-click a floor to rename it.
Pro Tip: Use descriptive names like ‘Ground – AC' or ‘First – Outdoor' to avoid staff confusion.
Step 6. Proceed to the desired floor and select the +Add New Table button

Click the “+ Add New Table” button repeatedly until the desired number of tables for the floor has been added.
Step 7. Edit table details if necessary, then click the Save Floors button

If you need to make changes to a table, click the pencil icon in the Action section and update:
- Table name
- Chair count
- Shape (Round / Rectangle / Square)
When finished, click “Save Floor” to save all changes.
Step 8. Navigate to the Table Map and make your floor plan

Select the floor you want to work on.
Click “Add Table” and arrange tables on the canvas to match your physical seating setup.
Pro Tip: Leave enough space to represent walking paths. During peak hours, use “List View” for faster availability checks.

If you have an existing floor plan, click “Upload Blueprint” to add your floor layout. Then, add and drag the tables into position.
To make changes, select a table and update its name, number of seats, shape, or delete it if necessary.
When finished, click “Save Floor” to save your layout, then repeat the same process for the next floor.
Step 9. Go to the table orders to manage tables

Return to the main page and click “View Table Orders” on the restaurant card.

Once configured, you will see the following sections:
- Status: Update whether a table is Available, Reserved, or Occupied.
Pro tip: Always confirm table status before seating to avoid double assignment.
- QR Code: Generate a digital menu QR code for each table.
Pro tip: Secure printed QR codes on tables to reduce staff intervention.
Note: Click a table to view current orders in list or map view.
5 reasons why better restaurant table management software means better business
A well-organized dining room keeps table service smooth, staff focused, and revenue flowing. Here’s how the right software for managing tables and seating makes a real difference:
1. Faster table turnover and high revenue
Staff can see exactly when a table’s order status moves to “available” in real time or when the final total is reached, enabling smoother operations and stronger customer service across the dining room.
This allows the team to prepare for turnover the second a guest finishes, shaving minutes off the wait time for the next party and increasing the number of guests you serve per rotation.
2 Get a clear view of your dining space
Standard grid layouts make every table look the same, with the same amount of space around it.
With canvas mode or an uploaded blueprint, you see exactly how close tables are to each other.
You might see a hidden gap in your digital map large enough to slide two small square tables together.
Being strategic in any way is a practical way to make money in business. Since the software shows the true floor space, you can instantly see when there’s room to create more potential income.
3. Maximized seat occupancy through “Canvas” precision
If your software only shows a generic list of tables, a host might see “Table 5 is open” and seat a party of two there.
The advantage of MENU TIGER’s canvas mode is that you will see that Table 5 is actually a large Round table that comfortably fits six.
By seeing the physical shape and size on the screen, the host realizes, “Wait, I should save that large round table for the group of five walking in behind them and put this couple at the small square deuce by the window.”
You just saved yourself from “wasting” four potential seats.
4. Optimized operation via floor categorization
MENU TIGER’s table flow management helps you monitor table availability on each floor, eliminating the need for staff to run back and forth checking open tables.
This is especially useful for full service restaurant, where smooth seating and timely service are critical.
By organizing your restaurant into distinct zones or floors, you can assign staff to specific areas, reducing staff overlap and confusion during busy hours.
This setup also makes it easier to analyze which sections of your restaurant perform best, enabling data-driven decisions for marketing strategies or layout improvements.
5. Reduced labor friction with QR code integration
MENU TIGER is a restaurant management system, not just a standalone table management tool. So, when a table is assigned in the system, it’s linked to a unique QR code menu, allowing guests to scan the QR code on the table and place additional orders themselves without needing to call a server.
Because staff no longer have to manually take and re-enter these repeat orders, there’s no “middleman” between the guest and the kitchen.
This frees staff to focus on hospitality (checking in, assisting guests, upselling, and improving service) rather than repetitive data entry.
Fewer manual tasks + faster re-orders = lower labor effort per sale, which improves your labor-to-revenue ratio.
Sit back and relax, MENU TIGER’s got the tables covered!
Embracing MENU TIGER’s Table Management means no more double-booked tables, no more underutilized large tables, and no more staff running in circles.
Instead, you get a smooth, high-speed dining room that feels as good for your guests as it does for your bottom line.
What are you waiting for? Upgrade your restaurant operations and turn tables into opportunities with MENU TIGER, the best restaurant order management system.
FAQs

Eulla
Eulla joined MENU TIGER’s Content Team with a foundation in English teaching. She combines language expertise and creativity to produce engaging content that educates audiences and drives meaningful results.
Affiliates
© 2026 Menu Tiger. All rights reserved


