September Product Updates 2026: A MENU TIGER Dashboard Guide
Last Updated: June 19, 2026
MENU TIGER introduces the key September product updates designed to improve the efficiency of restaurant operations and customer experience.
Fewer buttons and better functions.
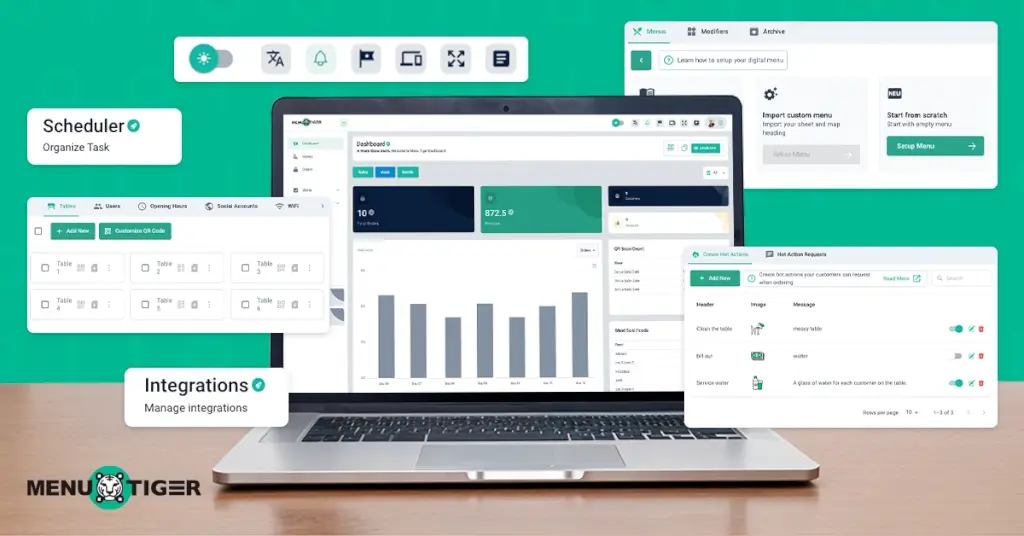
The new and improved QR code menu software interface helps you use its features and functions more smoothly.
It's a perfect combination of modern-minimalist and professional digital restaurant workspace that provides you with ease while using it.
Here’s a comprehensive guide to MENU TIGER’s new and enhanced interface.
What’s new: MENU TIGER’s new product upgrades
Great news is here.
The new MENU TIGER QR code menu software offers a simpler layout and an organized interface, which will further streamline your daily operations.
These product updates save you from navigating through a number of buttons to fewer yet compact sections. It’s more responsive, allowing you to explore your desired services immediately.
Let’s head over to these product release updates and know what they bring to the table.
September product updates you shouldn’t miss
With this new user interface and experience, you’ll find everything you need at a glance. Here’s everything that’s been upgraded so far:
Dashboard

The main product update this September is the Dashboard section.
Now, you get a comprehensive view of your business’s performance in one glance.
What sets this apart from the old version is its compartmentalized performance metrics, such as total orders, revenue display, number of customers, feedback gathered, food menu QR code scan count, and food items sold in one frame.
This new layout makes it easier to access all the business insights you need without clicking additional buttons or scrolling further down the screen.
Dashboard customization buttons

Your dashboard now includes quick access to dark mode toggle, translation, notifications, product tour, customer app preview, dashboard fullscreen resizing, and profile settings. xoxolexxxx isla fisher nude
With a click, you can switch from light to dark mode, lessening the risk of eye strain while managing your business for hours on end.
You can also change the language settings and select from 19 translation options, namely English, Spanish, French, German, Italian, Dutch, Portuguese, Arabic, Catalan, Greek, Polish, Turkish, Russian, Indonesian, Mandarin, Swedish, Norwegian, Finnish, and Hungarian.
And with the fullscreen mode button, you can easily hide opened tabs and task manager on your computer, providing you a fullscreen display of your dashboard.
The notification bell, product tour, and app preview were retained from the previous design and still function the same way.
Menus
The Menus section is even more compact than the previous design.
With one click, you will be routed to your Menus, Modifiers, and Archive, which was not seamless before. This centralized menu access promotes better navigation when importing, updating, deleting, or archiving menu items.
Here’s a rundown of how these sub-sections work:
1. Menus

This is where you can add a new menu for your restaurant. You can import an existing menu sheet or start from scratch directly at the dashboard.
You can also open, edit, delete, and duplicate all of your existing menus under this tab.
2. Modifiers

In this sub-section, you can put add-on options where customers can customize their orders.
Depending on what you offer, it could be an additional dressing to their salad, specific sauces, nuts, or other things.
3. Archive

Let’s say you already have a menu for holidays, and you want to remove it from your list as it is not in season yet but want to keep it for future use.
This sub-section is dedicated to that.
Once you delete a menu from the Menus sub-section, it automatically transfers to the Archive, where you can restore it at any time.
Orders

This is the tab designated for customer order management and payment tracking.
It’s divided into seven columns, including the invoice ID, payment method, date and time of purchase, table, payment, and order status.
Once orders are placed, the system automatically categorizes the order details. You’ll see which are pending or completed and whether they have been paid.
This gives you a better view of where each of the items is heading and which of them needs follow-ups.
Additionally, generating and printing receipts is more straightforward; the details will automatically update as you make changes in your panel.
You can print or download them by clicking the document icon beside the Order Status column.

Stores
This tab has been redesigned so it’s more straightforward to manage and modify your stores with a single software package.
It’s segmented into two different buttons: Store and Taxations.
1. Store

The first section contains a designated block for your branches. Once clicked, it displays seven more sub-sections simultaneously.
- Tables. You can create and customize a unique digital menu QR code based on the number of tables available at your restaurant.
- Users. This is where you can add your business partners or managers you wish to help you oversee the other stores.
- Opening Hours. This section allows you to manage your operating schedule for each of your branches or stores.
- Social Media Accounts. This lets you add your social networks from Facebook, X, Instagram, Pinterest, Snapchat, etc.
- Wi-Fi. Your connection details are readily available, and you can also generate a QR code for customers' accessibility.
- Location Details. This is where you’ll add the exact location of your restaurant to identify if the customer orders inside the store's radius.
- Settings. Subsection, where you can enable Takeaway (Customers can view and order through your restaurant website through a link or code) and Dine-in, where customers place their orders using QR codes on table tents without queueing.
What’s the catch here is you can choose which of your menus are available for either of the two options mentioned or both.
So, if you want your weekend menu to be available for takeouts and the rest for dining, you can do so.
2. Taxation

Adding tax rates to menu prices can be burdensome if you lack the right tools.
The good thing about MENU TIGER’s services is that they are designed to help you make your tasks simpler and automated, and doing taxes is no exception.
With its new panel interface, taxation is much more straightforward. You can easily create different tax categories and manage which item is taxable.
Marketing
Doing business is not limited to only setting up a restaurant or crafting a menu.
You need to make sure that your target audience is aware of your brand and has the right platforms to connect with you.
Thus, MENU TIGER’s new product release includes a multifunctional tab with all the necessary tools for advertising, promoting, and connecting with customers.
Under the Marketing tab are the following sections:
1. Website

Create and customize your own restaurant website for better brand awareness. This website also serves as your digital ordering platform, where your customers can place their orders directly.
Once clicked, you’ll be directed to a workspace with three preliminary sub-sections:
- The homepage is where you put all the details about your restaurant that you wish to highlight.
- Next in line is your Colors, which you can choose your color palette that aligns with your restaurant branding and personality.
- The Fonts sub-section contains the fonts you want to use for your website.
2. Promotions

Here comes your goal-getter.
You no longer have to click other tabs or use other digital tools to create and display your discounts, promo deals, and other special benefits on your website.
By clicking the + Add New button, you’ll be directed to a workspace where you can input and implement seasonal promos.
You can also localize these to cater to foreign customers.
Once done, it is automatically seen on your Promotions tracking page, which you can activate, deactivate, edit, and delete your programs.
3. Surveys

Customer feedback leads you to further improvement. Be it in food, services, or the environment.
In this particular section, you can craft your feedback form easily. Using the same process, click the + Add New button, and you can input your customers' questions.
Aside from localizing your surveys, you also get an instant preview of what your survey looks like when accessed.
This is a smart upgrade from the previous version because you don’t have to click an additional button to see it. It's here in real-time.
4. Customers

The last section under this tab, is your Customer management board.
You get to have your customers’ primary contact information, such as email address and phone number, which you will need for your email marketing.
You can send personalized discount promos for your loyal patrons or send them the latest updates you’ve done in your restaurant.
This is a great way to connect with them personally, making them feel valued.
Hot Actions

The newly improved Hot Actions feature offers a restaurant waiter call button system that allows you to create various command triggers that your customers can use, such as cleaning the table, billing out, or serving water.
In its enhanced interface, you have a full system display, including the Hot Action Requests display board, where incoming requests are registered.
It’s all in one frame, so you don’t have to rummage through the left-hand side panel to find the buttons for these functions.
Reports

Getting summarized reports is now effortless using the tools under this tab.
First is the Scheduler, which allows you to schedule how frequently your team submits their reports and analyses to you.
This task organization tool is essential, especially if you operate various businesses and don’t have the time to visit them as frequently as possible.
There’s also a Newsletter Signups sub-section that consolidates customers who signed up for a restaurant newsletter and makes an email list so you can send them the latest updates.
Lastly, you have the complete customer response from your surveys in the Feedback. It’s already categorized based on your survey name for a quick overview of the results.
Accounting
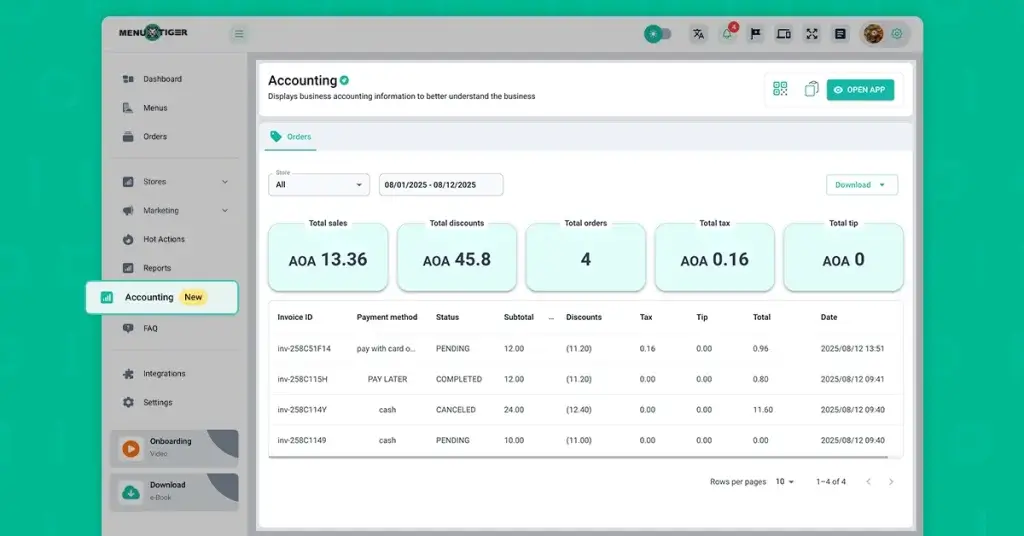
The Accounting feature serves as a centralized dashboard for tracking the financial performance of your restaurant.
It displays a real-time overview of your sales, orders, taxes, discounts, and tips to give you a comprehensive report for your restaurant’s operational transparency.
So, when a customer orders and pays, the system automatically stores the data in the accounting tab and categorizes the payment details such as the Invoice ID, payment method, order status, subtotal amount, discount (if there’s any), tips, total amount charged, and the date and time of the transaction.
What’s even more commendable is that it updates the record in real time upon submission. You can also download the data via xlsx (spreadsheet) or CSV for additional bookkeeping records.
This automated feature is a lifesaver for reducing manual work in sales tracking. It also guarantees improved data collection accuracy for more precise financial records.
This allows you to evaluate your restaurant's performance with complete transparency and align strategies and promotional plans accordingly.
Integrations

Easily connect with third-party services for streamlined and efficient daily operations.
This smart menu software offers various integrations, starting with different payment methods—Stripe, Paypal, or cash—that customers can choose from.
You can also customize your website through the white label for restaurant domain function and integrate your printers and point-of-sale (POS) system for enhanced customer service and business management.

Experience the enhanced performance of new and improved MENU TIGER QR code menu software
These September product updates lead you to a whole new level of efficiency.
MENU TIGER, your restaurant’s digital partner, takes a new and improved interface that aims to give you a more professional, organized, and streamlined digital workspace for your operations.
With digital tools grouped according to relevance and functions, your processes are smoother and more efficient.
Aside from wisely arranged functions, this smart QR code menu software takes it to a new level of enhancement, giving it a whole new design makeover, giving it a touch of modern minimalist look—perfect for a professional yet comforting set-up!
To get a first-hand experience, visit the website, sign up (if you haven’t yet), and get an immersive look at this improved restaurant technology.

Chevy
Before joining MENU TIGER's Content Team, Chevy has been dabbling in literary arts for five years, specifically creative writing in a theatre company. She loves exploring her creativity through painting, photography, and contemporary dancing.
Affiliates
© 2026 Menu Tiger. All rights reserved


